| the
knight (Fluph)
(steps
1 & 2 step
3 [steps 4 & 5])
|
|
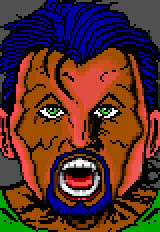
Step
4:
i changed the background from yellow to dk/grey for the
obvious reason that yellow is a sucky color :).. no, this
is ofcourse crap.. it just seemed to fit the picture better..
but i think backgrounds should have darker colors. that's
maybe why you have FOREground and BACKground colors in the-acid-ice-cia-whatever-draw
you're using.. (uh sorry if i left your drawing program out,
i'm sure it rox)
|
Step 4b:
i gave the nose more highlighting by giving the left side a full
upward line of pink. added two pink/ltgrey F1's to highlight the
tip of the nose. rounded off the lower side of the nose with brown.
and made the right side darker, coz that is the place where the
shadow is most. rounding off with brown (or any dark color) is an
easy technique you should remember. you can make stuff look more
real with it.. i like to call it anti-aliasing, which means as much
as letting your lightest color blend into the black space more.

Step 4c:
i did some fixups on the upper teeth too now. notice more or less
the same "anti-aliassing" technique i used for this.. the white
doesn't really clash with the black surrounding it, because i made
the transition softer with the light grey, and even softened the
lightgrey with darkgrey at some points. i did the same with the
lower teeth coz like i said, i wasn't happy with the "fuzzyness"
yet..
Step 4d:
i made the guy's neck stand out more clearly in this picture too,
so you can make out where exactly the neck, clothes, and background
are..
Step 4e:
i fucked around with his right ear at this point too, but not
really happy with it yet.. we'll get to that later too :)..
Step 4f:
added some minor highlight at the righthand side of his jaw with
pink/ltgrey too..
|
|
Step
5:
FINISHED!
|
steps
1 & 2 step
3 [steps 4 & 5]

|